
Een makeshift weerstation leent zich goed voor het experimenteren met verschillende digitale communicatieprotocollen op de Pi, zoals I2C, 1Wire en SPI …
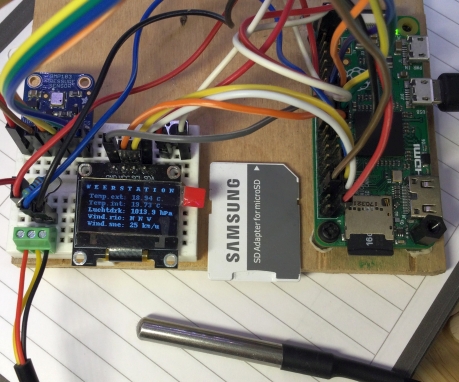
Tussen de dradenbrei zijn een Pi Zero, een mini OLED-display, een DS18B20-temperatuursensor (onder), en een BMP183-luchtdruksensor (linksboven) te zien.
Benodigdheden:
- Raspberry Pi (elke Pi is geschikt), bij voorkeur een Pi Zero W
- mini I2C OLED-display met SSD1306 chip (128×64 pixels)
- Dallas DS18B20 temperatuursensor (in dit geval in een waterdichte uitvoering met kabel)
- weerstand voor DS18B20: 4.7K of 10K Ohm
- Bosch BMP183 luchtdruk/temperatuursensor (van Adafruit)
- jumper-wires (male-female)
- microSD-kaart met Raspberry Pi OS Lite
- netwerkverbinding met ssh
- en veel softwarepakketten/bibliotheken
Korte uitleg digitale communicatieprotocollen
I²C staat voor Inter-Integrated Circuit (spreek uit: I-kwadraat-C). Deze databus is in 1982 door Philips Semiconductors ontwikkeld voor de communicatie tussen verschillende IC’s op één printplaat (bv. een controller en perifere IC’s) . Het eerste aangesloten apparaat op de bus wordt de master.
Het 1-Wire bussysteem voor communicatie tussen apparaten is ontworpen door Dallas Semiconductor. Het biedt data, signaling, en stroom over een enkele lijn, maar met een lage snelheid (16.3 kbit/s). Het wordt meestal gebruikt bij kleine goedkope apparaatjes, zoals digitale thermometers en weersensoren.
SPI (Serial Peripheral Interface) is een synchrone seriële datalink voor communicatie op de korte afstand, hoofdzakelijk in embedded systemen. Typische toepassingen zijn LC-displays. Het werkt in full duplex, dus zijn er vier verbindingen voor de communicatie nodig. Daarom wordt het ook wel “four-wire serial bus” genoemd. SPI heeft ook een snellere dataoverdracht dan I2C.
Aansluittabellen
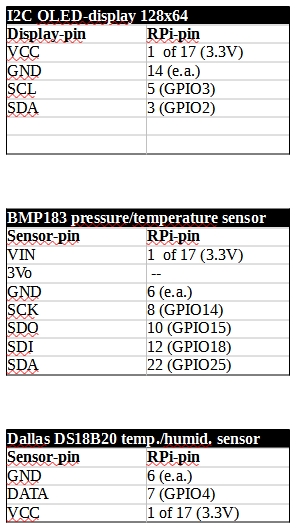
Weerstation: aansluitingen op de Pi
Sluit alles een voor een aan en test elk apparaat voordat je het volgende aansluit.
Log via ssh in op de Raspberry Pi en ga naar raspi-config (sudo raspi-config). Kies daar “5 Interfacing Options” en achtereenvolgens “P4 SPI”, “P5 I2C” en “P7 1-Wire” en activeer deze interfaces.
Mini I2C OLED-display
Voor het OLED-display kun je het beste de codebibliotheek van Adafruit downloaden:
https://github.com/adafruit/Adafruit_Python_SSD1306
In de directory examples vind je stats.py. Dit script hebben we gebruikt als basis voor ons Weerstation. Als dat voorbeeld werkt, is het display goed geïnstalleerd.
Een uitgebreide installatiehandleiding door Matt staat op Raspberrypi-Spy.
Hier de korte versie:
Installeer de onderstaande libraries:
sudo apt install -y python3-dev
sudo apt install -y python-smbus i2c-tools
sudo apt install -y python3-pil
sudo apt install -y python3-pip
sudo apt install -y python3-setuptools
sudo apt install -y python3-rpi.gpio
Check ter controle het OLED I2C-adres met:
i2cdetect -y 1
Installeer OLED Python Library van Adafruit:
sudo apt install -y git
git clone https://github.com/adafruit/Adafruit_Python_SSD1306.git
cd Adafruit_Python_SSD1306
sudo python3 setup.py install
Ga naar examples om wat demo’s te draaien:
cd examples
BMP183
De PCB breakout “Adafruit BMP183 SPI Barometric Pressure & Altitude Sensor” is al wat ouder en nu gediscontinueerd. Hij is opgevolgd door de even dure “Adafruit BMP280 I2C or SPI Barometric Pressure & Altitude Sensor – Assembled”. De codebibliotheek voor de BMP183 staat gelukkig nog wel op GitHub:
https://github.com/adafruit/Adafruit_BMP183_Unified_Library .
Desondanks hebben we het anders aangepakt en de handleiding van Maurice Hendriks op GitHub gebruikt. Hij maakt gebruik van de pigpio-bibliotheek en de pigpio-daemon (pigpiod). Daarmee verloopt alles heel soepel.
Belangrijke tip: installeer de numpy-versie van Raspbian, niet die van pip3, anders krijg je een missing library error! Dus NIET: sudo pip3 install numpy
maar:
sudo apt install python3-numpy
Eventueel eerst de verkeerde numpy weer deïnstalleren: sudo pip3 uninstall numpy
DS18B20
Sluit eerst de sensor aan op de Pi inclusief de weerstand tussen VCC en DATA. Is de 1wire-interface nog niet geactiveerd, dan kun je dat ook via onderstaande methode doen:
Voeg onderaan in /boot/config.txt een regeltje toe:
dtoverlay=w1-gpio
Reboot de Pi
Voer vervolgens in:
sudo modprobe w1-gpio
sudo modprobe w1-therm
cd /sys/bus/w1/devices
ls
Je ziet een directory die begint met “28-” gevolgd door een adres.
Vervang in het onderstaande commando de x-jes door dat adres en druk op enter:
cd 28-XXXXXXXXXXXX
Bekijk nu het bestand
cat w1_slave
Het resultaat is iets als het onderstaande:
65 01 55 05 7f a5 81 66 3f : crc=3f YES
65 01 55 05 7f a5 81 66 3f t=22312
22312 staat voor 22.312 graden Celsius
Nu nog de “kale” temperatuurcijfers losweken uit deze output:
temp=$(cat w1_slave | grep 't=' |grep -o '.....$') ; echo $temp
Crontab entries
Zet onderin de crontab van root onderstaande twee regels om het weerstation automatisch op te starten.
@reboot /usr/local/bin/pigpiod
@reboot python3 /home/pi/Weerstation/weerstation.py
Listing 1 (gebaseerd op een SSD1306-example stats.py van Adafruit)
# Copyright (c) 2017 Adafruit Industries
# Author: Tony DiCola & James DeVito
# Language: Python3
#
# Vergeet niet om vooraf de pigpio-daemon te laden:
# sudo pigpiod

import time
from pigbmp183 import bmp183
import Adafruit_GPIO.SPI as SPI
import Adafruit_SSD1306

from PIL import Image
from PIL import ImageDraw
from PIL import ImageFont

import subprocess

# ------------------------------------------------
# imports and URL-construction for OpenWeatherMap API
import requests, json
# base URL for OpenWeatherMap API
BASE_URL = "https://api.openweathermap.org/data/2.5/weather?"
# City Name
CITY = "Plaatsnaam"
# API key
API_KEY = "xxxxxxxxxxxxxxxxxxxx"
# updating the URL
URL = BASE_URL + "q=" + CITY + "&appid=" + API_KEY
# --------------------------------------------------

#Raspberry Pi pin configuration:
RST = None # on the PiOLED this pin isnt used
# Note the following are only used with SPI:
DC = 23
SPI_PORT = 0
SPI_DEVICE = 0

# 128x32 display with hardware I2C:
disp = Adafruit_SSD1306.SSD1306_128_64(rst=RST)

# Initialize library.
disp.begin()

# Clear display.
disp.clear()
disp.display()

# Create blank image for drawing.
# Make sure to create image with mode '1' for 1-bit color.
width = disp.width
height = disp.height
image = Image.new('1', (width, height))

# Get drawing object to draw on image.
# Get drawing object to draw on image.
draw = ImageDraw.Draw(image)

# Draw a black filled box to clear the image.
draw.rectangle((0,0,width,height), outline=0, fill=0)

# Draw some shapes.
# First define some constants to allow easy resizing of shapes.
padding = -2
top = padding
bottom = height-padding
# Move left to right keeping track of the current x position for drawing shapes.
x = 0


# Load default font.
font = ImageFont.load_default()

# Alternatively load a TTF font. Make sure the .ttf font file is in the same directory as $
# Some other nice fonts to try: http://www.dafont.com/bitmap.php
# font = ImageFont.truetype('Minecraftia.ttf', 8)

while True:
    # Draw a black filled box to clear the image.
    draw.rectangle((0,0,width,height), outline=0, fill=0)

    # Collecting the data
    # ----------------------------------------------------
    # Wind direction and speed from OpenWeatherMap via api
    # HTTP request
    response = requests.get(URL)
    # checking the status code of the request
    if response.status_code == 200:
        # getting data in the json format
        data = response.json()
        # getting the wind dict block
        wind = data['wind']
        # getting the wind speed
        speed = wind['speed']
        # getting the wind direction
        direction = wind['deg']
        print('Windrichting: ', direction)
        print ('Windsnelheid: ', speed)
    # ----------------------------------------------------

    # Temperatuur en luchtdruk van sensor Adafruit bmp183
    bmp = bmp183()
    bmp.measure_pressure()
    bmptemp = bmp.temperature
    bmppres = bmp.pressure
    print("Temperature Int: {0} degC".format(bmptemp))
    print("Pressure : {0} hPa ".format(bmppres / 100.0))
    bmppres = bmp.pressure / 100.0
    # Temperatuur van bmp183 terugbrengen naar 2 decimalen
    bmptemp = (float(bmptemp))
    bmptemp = "{:.2f}".format(bmptemp)
    # Luchtdruk van bmp183 terugbrengen naar 1 decimaal
    bmppres = (float(bmppres))
    bmppres = "{:.1f}".format(bmppres)


    # Temperatuur van Dallas DS18B20
    cmd = "cd /sys/bus/w1/devices/28-3c01b607b478 ; temp=$(cat w1_slave |grep 't=' |grep -o '.....$') ; echo $temp"
    Temp = subprocess.check_output(cmd, shell = True )
    # Temperatuur van DS18B20 terugbrengen naar 2 decimalen
    Temp = (float(Temp))
    Temp = Temp/1000
    print("Temperature Ext: {0} degC".format(Temp))
    Temp = "{:.2f}".format(Temp)


    # Write lines of text.
    draw.text((x, top+1), "W E E R S T A T I O N", font=font, fill=180)
    draw.text((x, top+14), " Temp.ext: " + str(Temp) + " C.", font=font, fill=255)
    draw.text((x, top+24), " Temp.int: " + str(bmptemp) + " C.", font=font, fill=255)
    draw.text((x, top+34), " Luchtdrk: " + str(bmppres) + " hPa", font=font, fill=255)
    draw.text((x, top+44), " Wind.ric: " + str(direction), font=font, fill=255)
    draw.text((x, top+54), " Wind.snl: " + str(speed) + " km/u", font=font, fill=255)

    # Display image.
    disp.image(image)
    disp.display()
    # Pauzeer 5 minuten
    time.sleep(60)
NB: Vergeet niet om vooraf de pigpiodaemon te laden met: sudo pigpiod
Pingback: Mini-weerstation - Avonturen met de Raspberry Pi